|
<< Click to Display Table of Contents >> Simplified Work Order Form |
  
|
|
<< Click to Display Table of Contents >> Simplified Work Order Form |
|
This is the standard RO form. Although there are more buttons on the screen, area's on the screen are colored and segregated to help you find what you are looking for fast (at least that is the hope). And in the Setup there is a way to hide the tabs you do not need.
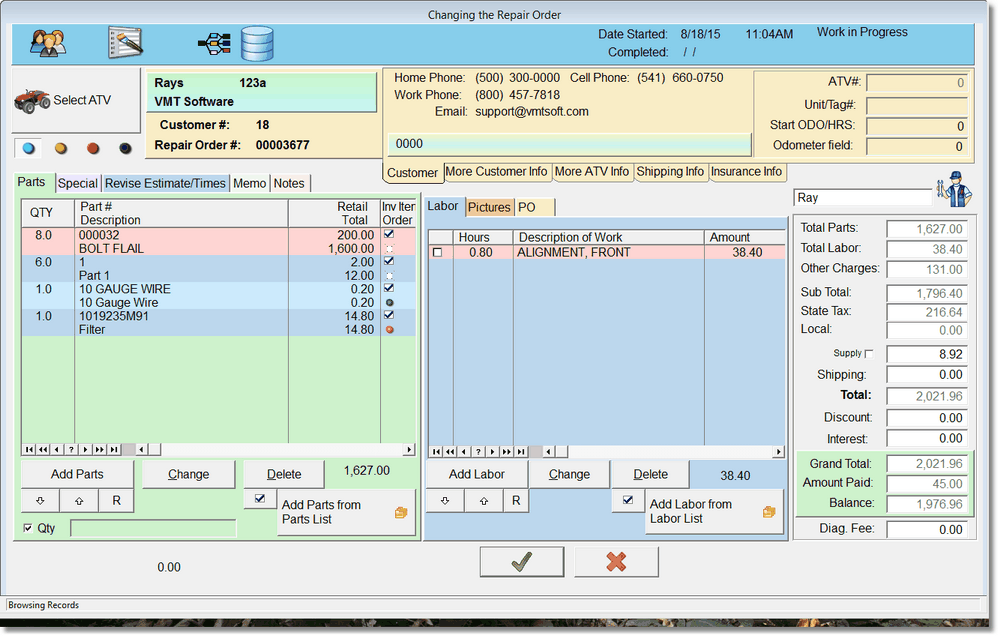
As you can see, the parts and labor both show on the same screen, as well as the customer, vehicle info, totals, and the editing buttons.
In order to fit all of this on the screen, we use tabs.
Note: For the Parts and Labor tabs, you can right click on the bottom check marks ![]() and the parts or labor tab will expand to full width.
and the parts or labor tab will expand to full width.
It's a toggle, so you can turn it on or off... try it!

(Click here for More information about the Parts list)

Click here for more information on adding labor.
The Special Tab

Specials (sometimes called Other) items are for items that are not labor or parts. You can use this for just about anything, special taxes, discounts, disposal fee's, or anything else that you need. Some invoices show these items as other charges instead of special charges. Probably because we really didn't have a good name at the time. Don't worry though, you can always customize your invoice.
Click Here to learn more about Special Charges
Revise Estimate Tab
If you need to show your customers changes in estimates, this is the tab to use.
Click Here to learn more about Revised Estimates
Memo Tab
The memo prints on most RO's, so be careful what you say here.

The Notes Tab
The notes tab allows you to put unlimited notes for this RO. Each note will automatically have the Date and Time the note was added. These do not print on invoices, they are for shop use only.


The Purchase Order Tab

If the Purchase Order tab is available, you can select a Purchase Order (PO) by clicking on the Select PO button. You can add Parts to the PO manually by clicking on the Insert/Add button, but the idea here is to add parts from the work order. You can add inventory or non-inventory parts from the parts list on the left by clicking on the part (hold down the mouse button), and drag it (keep holding down the mouse button), and dropping it on the selected list.
If you drag and drop a part on the list by mistake, no problem, drag and drop again and the program will ask you if you want to remove the part from the PO list. If you say Yes, it will simply be removed. If you say no, it will display the PO list the part is on. Try it and play with it, it's easy to take parts off of the list.
You can tell if a part is on a PO list somewhere if the red dot is on the screen:

Notice the Red dot, this means the part is on a PO somewhere. To find the PO that has the part, just drag and drop it onto the PO list. The program will ask you if you want to delete the part off of the PO. Say NO, and the PO that has the part will display.
Tricky? Yes! But Cool! And, let's say you accidentally put the part on the wrong PO.. no problem, drop it back onto any PO, tell it to delete, then select the right PO, and drag it onto that one.
If you still have the part in the wrong PO, and go to the PO screen where you will place the part(s) on order (tell the program the parts have actually been ordered), then there is a way to transfer a part from one PO to another.
The red dot knows that the part has bee put on a PO, but there is no way to know if the part was actually ordered.
Normally, all order items will be from the same vendor, but we don't force it. But when you drag a part to a PO that is a different vendor, the program will offer to update the Parts vendor. If you say no, the vendor on the part will remain as it was.
One of the great things about adding items from the work order screen, is when you receive these items, they remember where they came from, and will display the work order, customer, and vehicle information when receiving. So you'll know where to put the parts. It's always a good thing to know where the parts go!
Once the part is received (if it has been put on the PO in this manner), a green dot will display. That way a technician can look at the RO and see his part has been received at the shop. This is theoretical of course, another tech might have absconded with the part, which can happen if a shop orders many of the same parts.
You can see information about the PO status for the part at the bottom of the part screen...

PO# 0
When you drop parts onto PO# 0 (The default PO when you first enter into a work order screen), the program will not ask you to change vendors, and all of the parts will be added to PO# 0. Then, when you go into the PO screen, it is very easy to assign each part order to a PO. This will save you time here so you can do the real ordering later. If the PO has a number, just right click on the PO button and it will change it back to the PO# 0 list.
Selecting the default Tech

Notice there is a look-up button available for the tech. Click on it. It is highly recommended you use the look-up to add the techs, this way you have consistency for reports later on. If you select a tech in the RO, that tech will be added to labor, parts, and special items as you add them automatically. You can also select a default tech in the company setup, so you don't have to worry about it at all, especially if you're the only tech. Techs are required so it's much easier this way.
At the top of the screen is the customer tab. From here you can see all current information about this customer. The vehicle # is the number that is assigned to the vehicle by the software (it is only relevant to the software).
 Click on the Lookup or Add button on the left of the screen to select or add a vehicle...

The Unit / Tag# is for you to assign to the vehicle (not required). You can edit the odometer, it is stored in this work order.
There is more information in the other tabs, click on them to find out.
If you edit the customer information, this work order will change (get the information from the customer record, only if you edit the customer from within this work order.
To do that, click on the customer Icon
![]() which is located at the top of the screen along with other icons. To see what they do, simply hover your mouse above the icons... or, keep reading.
which is located at the top of the screen along with other icons. To see what they do, simply hover your mouse above the icons... or, keep reading.
![]() This icon brings up the check it screen. This is basically a to-do list that you will setup in the company setup area (once).
This icon brings up the check it screen. This is basically a to-do list that you will setup in the company setup area (once).

This information is attached to this particular work order / invoice. It can be printed out by clicking on the icon... on the main work order browse screen (the screen previous to this). ![]() The idea is to check the items you want your technician to check, then print out the list, then they can initial the items that were checked and make notes on paper... yes, paper!
The idea is to check the items you want your technician to check, then print out the list, then they can initial the items that were checked and make notes on paper... yes, paper!
The next Icon ![]() is for adding a package of items. These packages can contain parts, labor, and special items. You can make unlimited packages. They will get added, not replace items in a work order, so if you add the package twice, you will see 2 of each item.
is for adding a package of items. These packages can contain parts, labor, and special items. You can make unlimited packages. They will get added, not replace items in a work order, so if you add the package twice, you will see 2 of each item.
Status Lights

At the top of the screen there are 5 Status 'lights'. Each one has a different meaning. You can make up your own meanings, but here is what we define them as. You can turn on one light for each WIP or Estimate. It is simply a status. This let's you select RO's with just that one status in the work order browse screen.
Dark Green: No Status
Blue: Waiting for an estimate or to be put in the shop.
Yellow: Waiting on parts.
Red: Being worked on.
Green: All done, good to go.
Not enough statuses...
You can select and add multiple status records in the company setup area. Then from the RO screen you can select one of your custom status descriptions.

Just click on the down arrow to select.

The Discount Calculator is reached by Pressing the almost hidden discount Button.
Drag your mouse cursor over the top of the Word Discount, and you'll see it is really a button.

Click on the up or down arrows to adjust the Discount Percentage. It will increment by the number on the right.. in this case 5 percentage points at a time.
Edit RO Number
Many shops start their new year with a new RO Number. The program finds a new RO number automatically by internally going to the last (biggest) RO number available and adding 1. So the best way to change the starting RO# is to add a fake RO, change the number to a number -1 that you want to start with. So if you want to start with RO# 6400, add a new RO, Change the RO# to 6399 and save it. Then the next RO will start with 6400. Or, create a new real RO, change the number to 6400 in this case, then save it, then you can work on it as usual.
To change the number hold the Control key and right click on the Select Vehicle button. A new screen will display with the current RO. Change it and click OK, then be sure to save that RO by clicking on the Green Check button.

Split a Repair Order
See the Topic on Splitting a Repair Order