|
<< Click to Display Table of Contents >> Split Repair Order |
  
|
|
<< Click to Display Table of Contents >> Split Repair Order |
|
There are times when you might want to split a repair order. For instance if you have a customer that doesn't want certain things done, you can 'Cancel' Parts, Special Items, or Labor Items, then split the RO and the stuff you canceled will get transferred to an estimate and will at the same time be deleted out of the current RO.
First, here is an RO screen with some stuff canceled. Stuff of course is a technical term meaning Labor, Parts, or Special Records in a Repair Order.
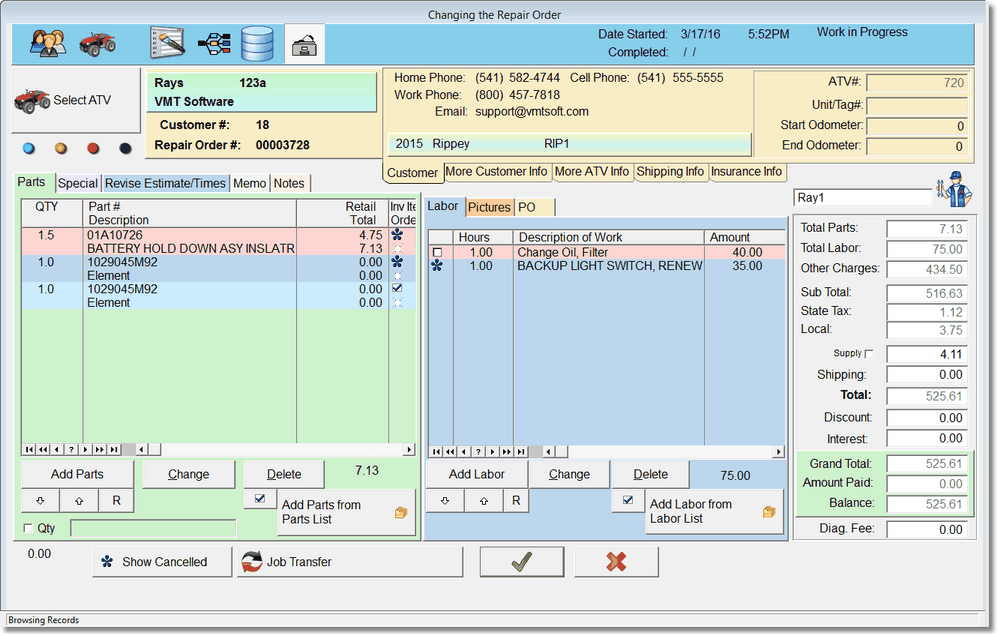
First, take note of 3 new buttons.
The top button  (We'll call it the Split Button) turns on or off the bottom new buttons and displays or does not display the Asterisk icon
 ![]() .
.
When it is turned off, it looks like this:  . Click on it a few times, it is just a toggle switch.
If you turn off the Split button, everything is back to normal. The items still are internally marked as canceled, but the Asterisk Icons won't be displayed, and if you exit the RO, the program won't ask you to split the RO.
When you first go in to edit an RO, if there are any 'Canceled' items (Items with a ![]() ), the Split Button will automatically be on. That is so you will know there are canceled items.
), the Split Button will automatically be on. That is so you will know there are canceled items.
How to Cancel Items for Split.
In order to cancel items the Split Button must be on. Then, there are 2 buttons that will show on the bottom of the screen.
![]()
This Button does nothing.. yet. This button is for 'Dropping' stuff onto it. Let's say you want to cancel a labor item. Just Drag and Drop that Item onto the Job Transfer button. At that moment the labor item will now have a ![]() next to it, indicating it is a canceled item. To 'Un-Cancel' it, simply re-Drag and Drop that item back onto the Job Transfer Button. Try it.
next to it, indicating it is a canceled item. To 'Un-Cancel' it, simply re-Drag and Drop that item back onto the Job Transfer Button. Try it.
You can of course do this with Parts, Labor, and Special Items. You cannot cancel Notes or revisions. The notes will copy to the newly split RO estimate and remain in the current RO. Revisions and Payments will only be available to this original RO, the new RO/estimate will have no revisions, or payments. The newly created estimate will have no Amount Paid either. Be careful if you have already put a deposit on a WIP, because you don't want the amount paid to be less than the amount paid, resulting in a negative invoice. If there is a problem like this, it is best to refund the amount paid on the invoice to the customers account (Return Deposit).
The Show Canceled button is a toggle that will let you display All items (the default), just canceled items, or just kept items. This way you can see exactly what you are doing before you do the actual split of the RO.

Click on it several times to try it.
Doing the Split!
OK, so let's do this thing. To finally split the RO, the Split Button must be ON when you exit the RO screen. At that point the program will display a window asking you if you want to split the RO. Again, if the split button is off, the program will NOT ask you to do the split. This is handy when you want to go edit another invoice and don't want to get asked the question about splitting the RO. If you forget to turn off the split button, no big deal, you'll be asked if you want to split the RO and you can just click close.
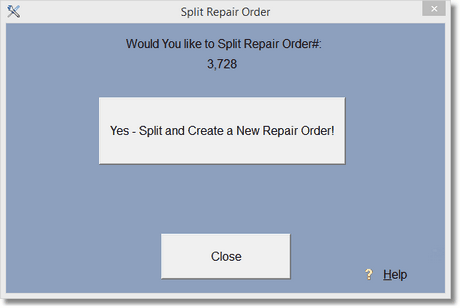
At this time, you cannot UNDO a split. So make sure you're positive. If you accidentally split a transaction, you will need to find the estimate in the estimate area, perhaps print it out, delete it, then add those items back to the original RO.
All the canceled items get moved into a new RO as an estimate. They are still marked as canceled and you can still see the ![]() besides the items. This helps you realize it was from a split. Also, we may use that information in the future to create a report to show a customer what items they decided not to purchase or fix. If and when you transfer the estimate back to a WIP, the canceled items will be unmarked or 'Not' Canceled. This can also be used as a trick to un-Cancel everything, just transfer the WIP to an estimate and back again. Parts that came from inventory will be added back to the Parts Inventory.
besides the items. This helps you realize it was from a split. Also, we may use that information in the future to create a report to show a customer what items they decided not to purchase or fix. If and when you transfer the estimate back to a WIP, the canceled items will be unmarked or 'Not' Canceled. This can also be used as a trick to un-Cancel everything, just transfer the WIP to an estimate and back again. Parts that came from inventory will be added back to the Parts Inventory.
The non-canceled items are deleted from the original RO. Both RO's are recalculated, however the original RO will remain on the screen with the original price. This makes it easier to see it right away, plus we don't know how to make the screen refresh... and that's a long technical boring story. So just go ahead and double click on the original invoice right away to see the new price, then save it.