|
<< Click to Display Table of Contents >> Point of Sale |
  
|
|
<< Click to Display Table of Contents >> Point of Sale |
|
This is the Point of Sale Screen, also referred to as the POS screen.

Here is a YouTube Video:
Point of Sale
The Point of Sale screen is very simple to use. It is designed to sell parts to a customer, and print an invoice.
The first thing you need to do is select a customer. To select a customer, click the button in the upper left corner of the screen or press the F2 Function key. You can also select the cash button, which will select a cash customer if you have previously defined a cash customer in the Company Setup.

If you know the customer number, you can simply type it in. If you don't know what the customer number is or it is a new customer, just press or Click the F2 button to look-up the customer. You will be shown the customer lookup screen.

From this screen you may search for and select a customer, or add then select a customer. Once you've selected a customer, you will see the following screen.

There is already a part on the screen called a Bolt Flail. You can add as many parts to this screen as you like.
Note: The Delete All (F7) button will let you delete all items off of the screen, then take you back to the field where you enter the customer ID. You can also delete items one by one, or double click on them to change the price or quantity.

To add a part, you can simply type in the part number, then press enter. You can also swipe the barcode with a barcode scanner. The barcode scanner should press enter for you. If it does not, you will need to program your scanner.
If you want to simply look-up a part, press F5 or click the Find Part# button. This will bring up the standard inventory lookup screen.
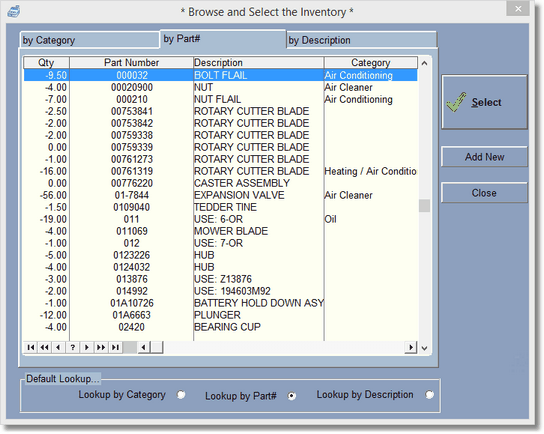
Note: The Default Lookup... you can set it to remember how you look-up parts.
If you would like to enter a quantity after you've scanned the barcode, typed in the number, or looked for the part by using the F5 key, simply press the Quantity button. After you select the inventory item, the program will then ask you for the quantity.
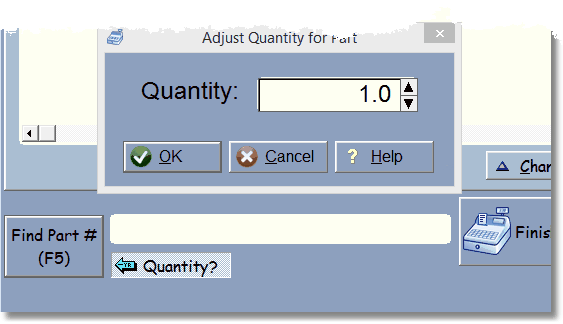
You can use the arrows to select a quantity other than one, or just type in the quantity.
Now that you've selected the parts you're going to sell to the customer, just press enter on the part entry field, or click finish. You will then be taken to the standard "Tender Screen" where you can pay for the invoice.
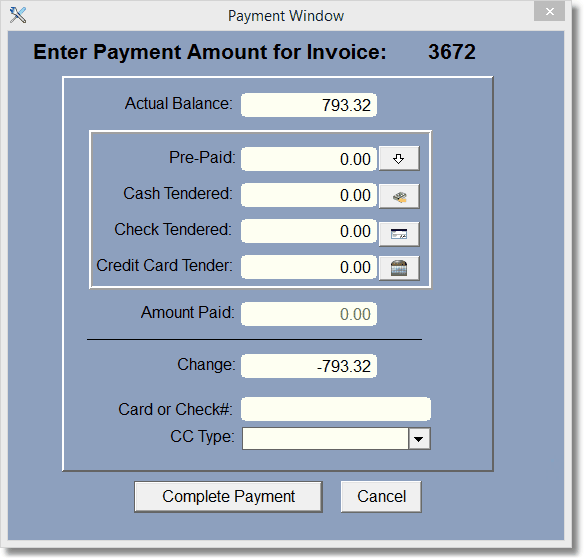
You can click the buttons next to the Cash, Check, or Credit Card Tendered fields to help you with the amount tendered. Be sure the change is not a negative number or it will be charged to their account.
Let's say they gave you 150 cash, you can type in 150 in the cash field, then click the button next to the check field and it will figure out the 158.20 for you. This makes it easy to split the transaction amount.
Click Complete Payment.
Now, the program will create an actual invoice exactly like an RO. You will be able to find it under invoices in the main work order section of Digital Wrench. All the money will go to the cash and transaction files as if it were a standard Repair order, and the parts will be taken out of inventory.
Here are a couple of other things you can do on this screen...
When you are first getting ready to select a customer, you will see the most recent customers on the upper right portion of the screen. You can select a previous customer and double click to bring that customer up and ready for a sale.

This only shows customers since you have run the program. Once you leave the POS screen the previous customer list will be empty.
In the company setup, under each computer, you can setup your cash customer. You'll also be able to override the invoice that gets printed from the Point of Sale.
