|
<< Click to Display Table of Contents >> Components |
  
|
|
<< Click to Display Table of Contents >> Components |
|
Components are additions to units/vehicles. For instance, if you had an automobile, a component could be an engine. This engine can have multiple parts attached to it.
Or like in our example, a component could be Oil Change, this way we can have our exact parts for an oil change, the right oil, filter, etc.

Each component can have specific information as you can see above, but is not required. Click on Parts for Component.
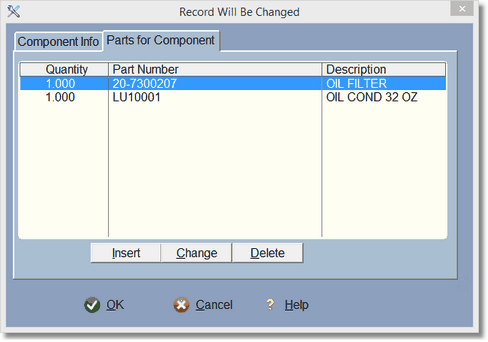
From here you can add as many parts as you like to your component:

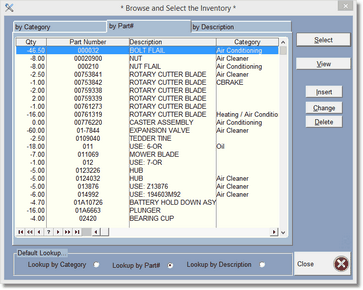
Click on the icon to the right of Part Number to look up and select a part from your inventory. Parts entered here are required to be in inventory.
Components get copied to the master component file if you add the Unit/Vehicle to the Master Component File, however you should add the components first. Or, you can add them to the Master Unit/Vehicle file first, and select the Unit when you are adding a unit to a customer.
What are components for?
Having components attached to a customer unit/vehicle let you select individual parts for the components, or all the parts for a component when creating a repair order (RO).
To get to the selection screen, create an RO, select the unit/vehicle for that customer by clicking on the select button.

Assuming you added components to this particular unit/vehicle, click on the component button.
The unit/vehicle's component list will display on the right side of the screen.

To get a part, drag the part to an empty area of the RO parts browse screen by clicking and holding down the mouse on the components part, then moving the mouse to the RO parts. Let go of (drop) the mouse when the cursor changes from a 'Do Not' symbol to a clear box.
You may also drag and drop the component or all of the components by dragging from the component name, or the very top where it says component list.
If you make a mistake, you can hold the shift key and click on the delete button (under the RO parts list) to clear all of the parts on the RO.
You can also add parts to the component list. Bring up the component list by clicking on the Components button. You can use the Insert button to add a new component by clicking on the Component List for Machine.. then pressing or clicking insert. This lets you add a component. To add a part to a component, click on the component and click insert, or click on the component (First, very important), then drag and drop a part from the parts list onto the component. You must click on the component name first for the drag and drop to work.
Again, the parts for the components must be from the Inventory/Parts list.
Update/Add Master
When you create a component list, it is nice to be able to save it for later use. You can click on the Add to Master button and the Unit and all of the components and components parts will save to the master list.
If you have already added to the master list or originally gotten the unit from the master list, the Update Master button will display instead of the Add Master button. This will revise the master component for this unit with any changes or additions (not deletions).
If you click on the Update FROM master, the current unit will be updated with any changes or additions (not deletions) you or someone else made to the master Unit and components. This is a very handy feature that can help you keep the master and the current unit you're working on in sync.
Just remember if you ADD to the master for this unit you may end up with multiple of the same unit. So to be safe when creating a unit/vehicle, try to find it in the master unit list first, then if you don't find it, add the components here and ADD it to the master unit list.
The other thing a component list is good for, you can create packages with components names, so when you select the package (say Oil change), it will bring in the specific parts for this vehicle.
This is not hard and you can play with it without hurting anything.